Let me ask you a question:
Have you backed up your blog recently?
Regularly backing up your data is essential if you want to stay in the blogging business for the long haul.
To help you with this task, allow me to introduce you to my go-to backup tool: WPvivid.
But first, a quick word about site backups.
Table Of Contents
- 1. Why You Need Backups?
- 2. What is WPvivid?
- 3. How To Use WPvivid Pro?
- 4. Downloading and Installing WPvivid Pro
- 5. Setting up your general backup schedule
- 6. Setting up incremental backups
- 7. Linking your cloud storage accounts
- 8. Scheduling automatic backups before updates
- 9. Restoring backups
- 10. Fine-tuning WPvivid’s backup settings
- 11. Other WPvivid features
- 12. WPvivid Pricing
- 13. Conclusion
Why You Need Backups?
As WordPress bloggers, we’re used to being in charge of everything.
Plugins, themes, hosting configuration – you probably handle all of them yourself.
Most of the time, tasks get done without a hitch. And after installing, updating, or changing something in your blog, you’re back to business as usual.
Unfortunately, mistakes happen.
A lot of things could go wrong whenever you’re working on your website’s backend. And, when they do, you could end up with a broken site.
That means no content for your audience, no traffic for you, and no pages for Google to index.
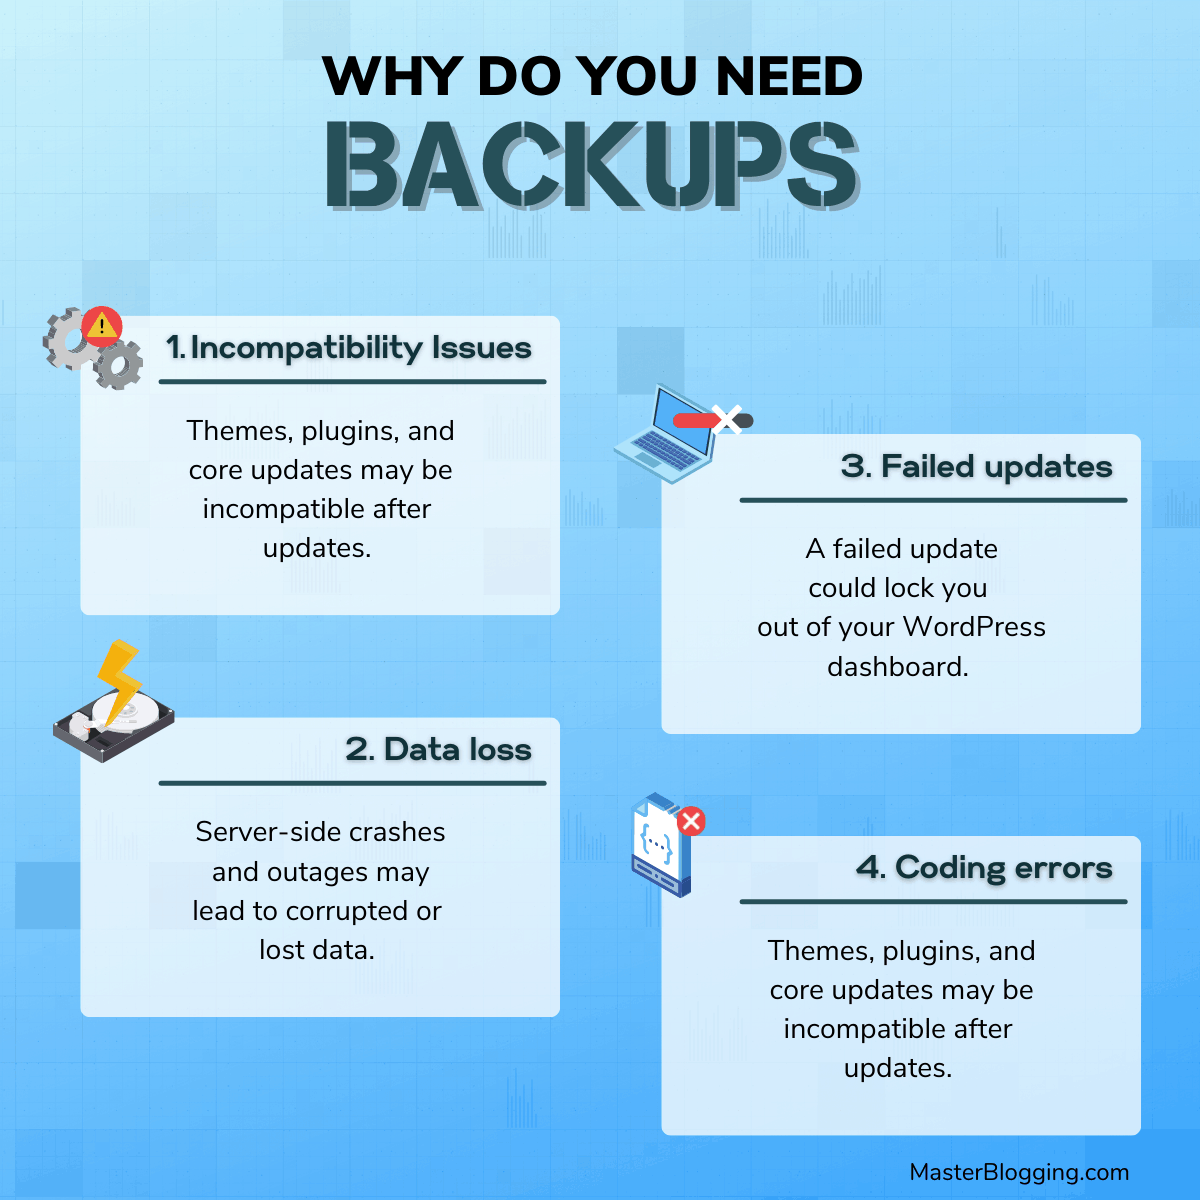
Here are some of the most common reasons why websites break:
- Incompatibility issues – Plugins, themes, and WordPress itself regularly ship out updates that improve the functionality and stability of their platform. However, updates may cause compatibility issues between components that could affect your website’s usability.
- Data loss – Imagine working for hours on your website only for your data to be lost or corrupted. It may be unlikely, but it’s still possible due to server-side outages and crashes.
- Failed updates – Veteran WordPress users will advise you to always back up your site before performing an update. That’s because updates can be unpredictable, especially when talking about the potential issues that a botched update could create.
- Coding errors – I still remember the first time I was locked out from my own WordPress dashboard. While it took me hours to figure out the problem, it’ll only take you minutes to restore everything via backups.
With regular backups, you can always get your website up and running no matter what.
True, most web hosting services have a backup feature baked into them. But it still pays to have a dedicated platform that handles your backup needs – on autopilot.
That’s why I decided to try WPvivid some time ago.
And, since then, I stopped relying on the free backup service offered by my web host.
Let me show you why.
What is WPvivid?
WPvivid is a backup and migration plugin specifically designed for WordPress websites. It comes with features that make backups as reliable and efficient as possible, like automated and incremental backups.
Apart from backups, WPvivid includes a host of other features that can help you optimize or even redesign your site. But more on that later.
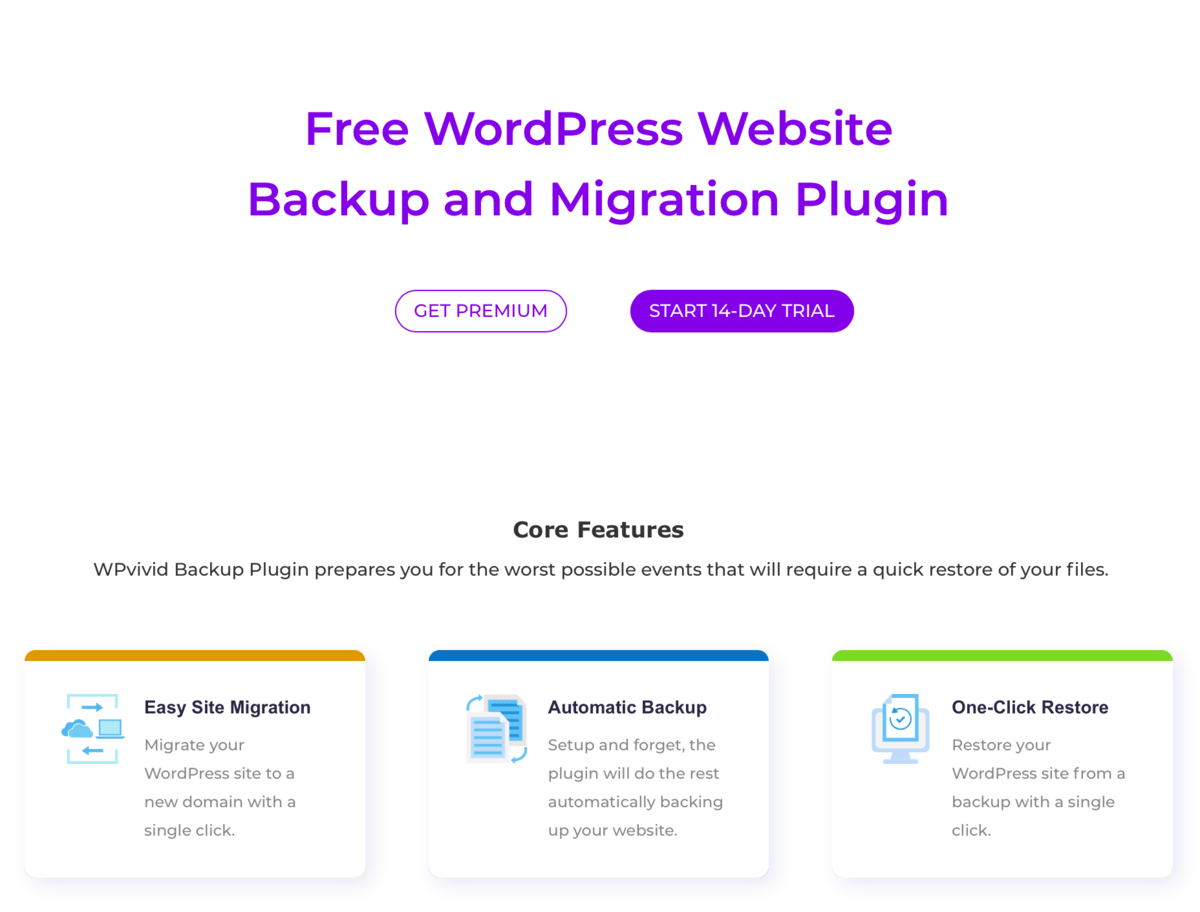
Don’t have the budget for an automated backup plugin?
No worries – you can download the free version of WPvivid straight from the WordPress plugin library.
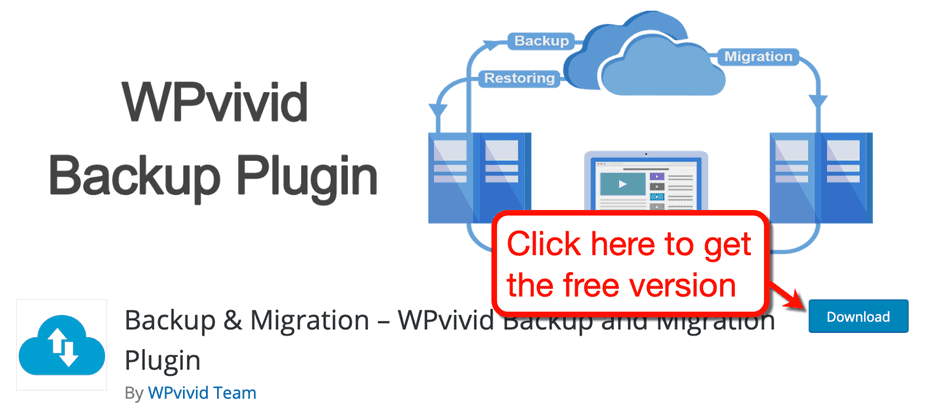
Just remember that the free version doesn’t have most of WPvivid’s advanced features.
Sure, it can still help you with basic backups and migration.
But you’ll miss out on “Pro” features like:
- Advanced backup scheduling
- Multiple cloud storage backups
- Automatic site migration
- Incremental backups
We’ll take a closer look at those features in a minute.
In the meantime, let’s start with how to set up WPvivid Pro.
How to use WPvivid Pro?
Despite its advanced features, WPvivid is surprisingly easy to install and use.
Here is a short walkthrough of WPvivid’s core features:
Step 1: Downloading and installing WPvivid Pro
After purchasing WPvivid Pro, you’ll be asked to download the plugin package. You can do this from the “Downloads” page in your account area.
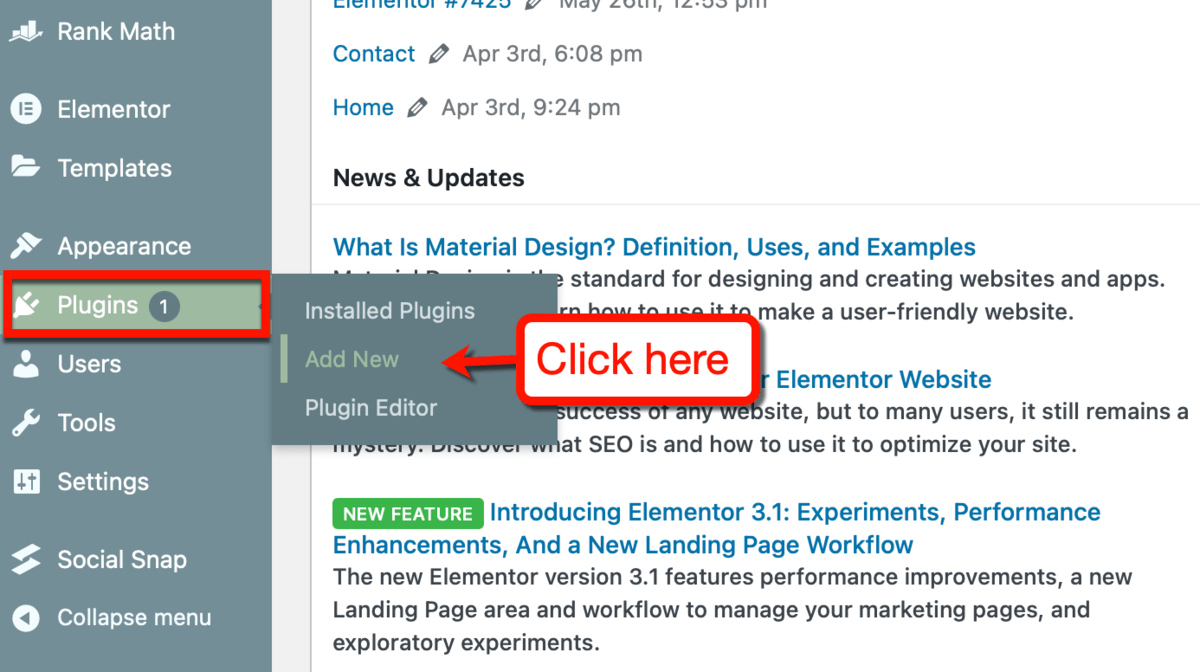
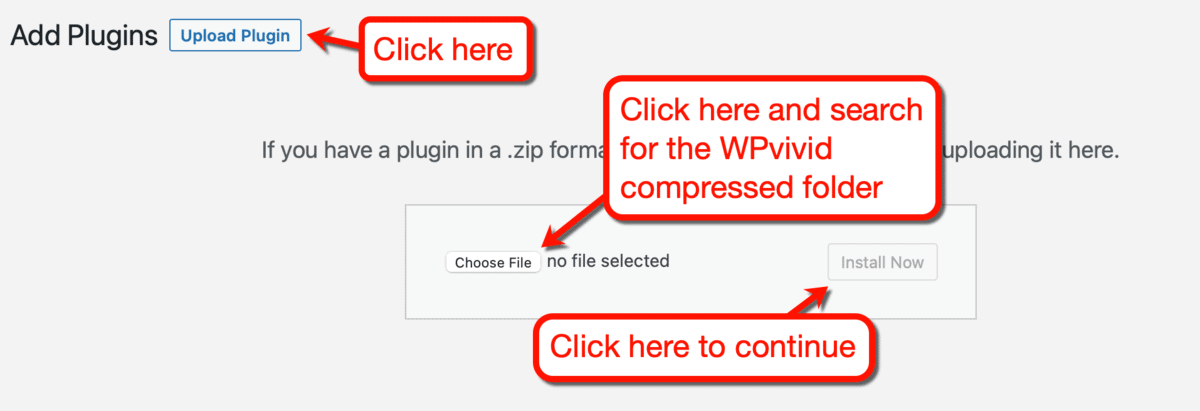
To install it on your WordPress, select ‘Plugins’ from the main menu and click ‘Add New.’
On the “Add Plugins” page, click ‘Upload Plugin’ just above the navigation bar.
This will pull up the upload interface, which you can use to select and install the plugin from your computer.
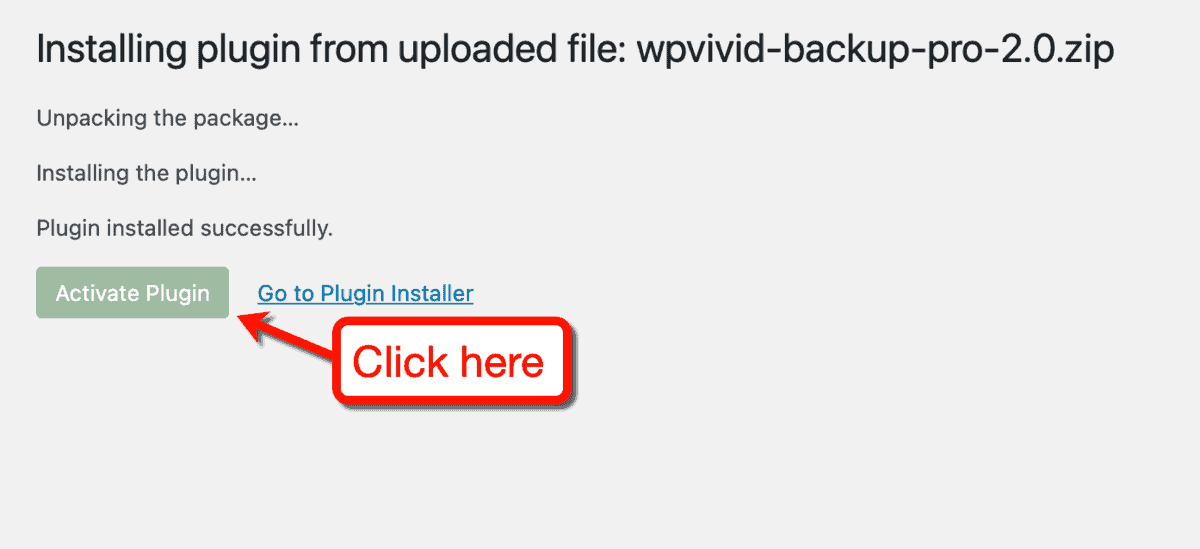
Give WordPress a couple of seconds to install WPvivid. Once the installation is complete, click ‘Activate Plugin’ to proceed.
After installation, you need to enter your WPvivid license key in order to unlock its premium features.
WordPress should automatically take you to WPvivid’s “License” page. If not, go to your WordPress dashboard, select ‘WPvivid Plugin,’ and click ‘License.’

On the “License” page, paste your key into the “License” field and click ‘Activate.’
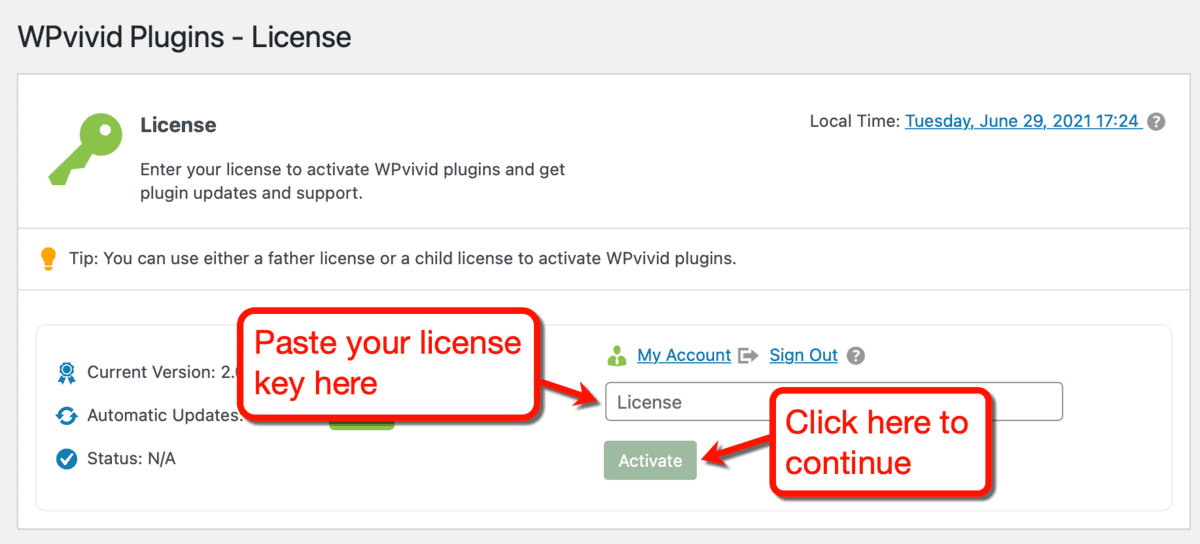
It should only take a couple of seconds for WPvivid to verify your account.
Once your license is verified, all that’s left to do is install the essential WPvivid plugins. This includes the core backup tool, image optimization add-on, and staging tool.
To install these plugins, select their checkbox and click ‘Install Now.’
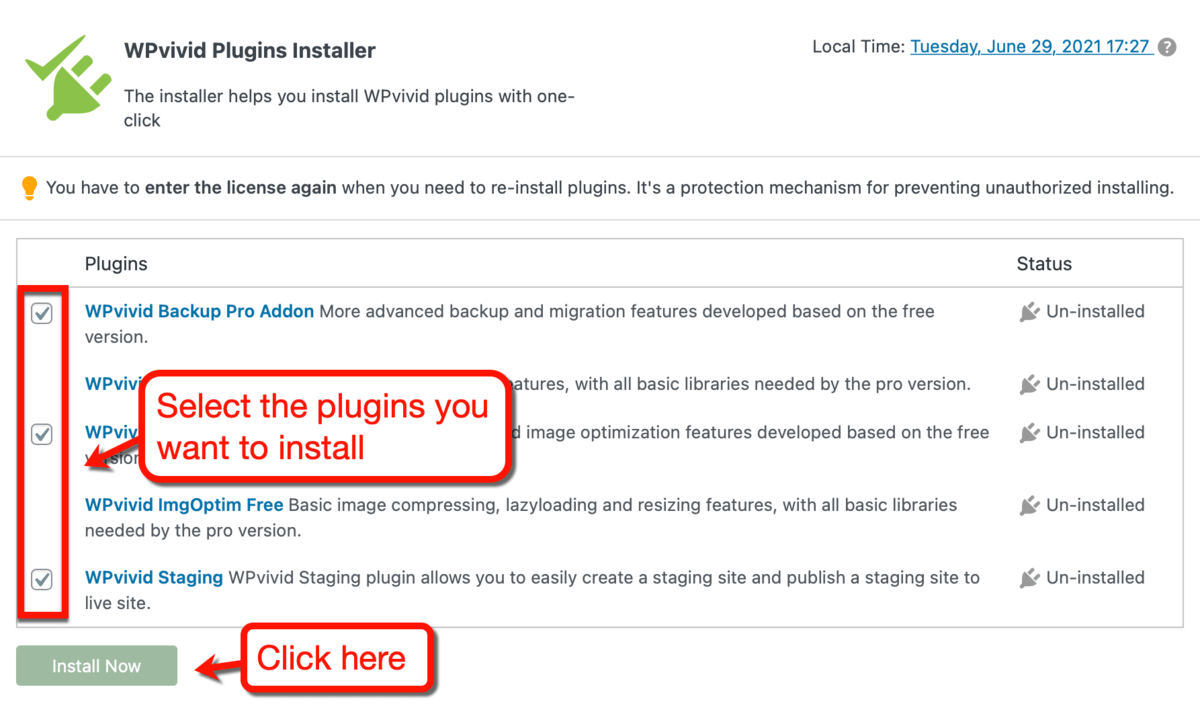
Take note that you’ll have to enter your license key again whenever you need to reinstall WPvivid plugins. I suggest saving a copy of your license key on your device for safekeeping.
With your WPvivid plugin installed and activated, you now have full access to every feature it has to offer.

Step 2: Setting up your general backup schedule
Nice – you now have WPvivid installed and fully functional on your WordPress website.
The first order of business is to set up your backup schedule.
To do this, click ‘Schedule’ from the WPvivid dashboard. Alternatively, click ‘Backup Schedule’ under the ‘WPvivid Plugin’ sub-menu.
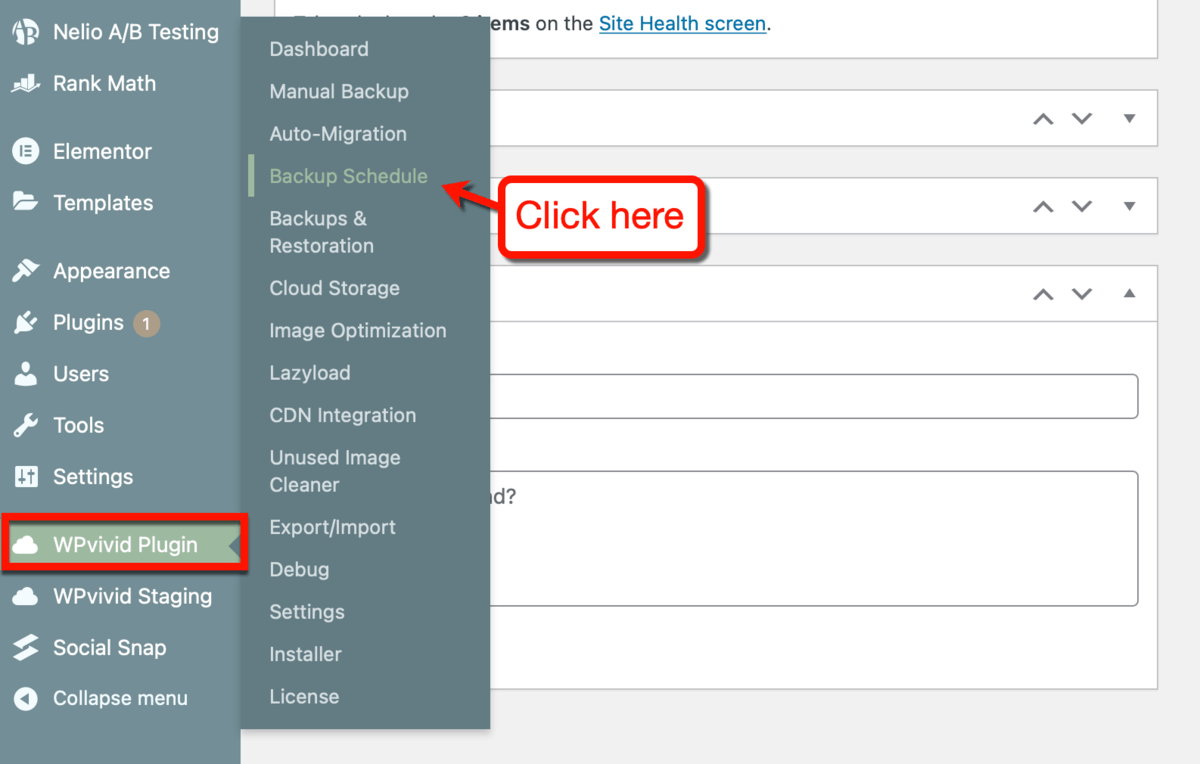
Now might be a good time to discuss the two types of backups you can perform with WPvivid: incremental and general.
A general backup is the standard backup that can include everything – regardless if you changed them or not. An “incremental backup,” on the other hand, only creates backups of files that were changed since the last full backup.
Both backup types allow you to specify which files, folders, and databases will be backed up.
To create a general backup schedule, switch to the ‘General Backup’ tab and click ‘Create a new schedule.’

This will bring up the WPvivid scheduler, which lets you define your backup cycle time, location, and settings.
The frequency of your general backups depends on a few things:
- Your site management activities – Do you regularly modify your themes or plugin settings? Are you frequently building or editing pages?
- User interactions – How often do users leave comments, register, or make purchases? Remember that WordPress will keep records of these events in your database.
- Your content calendar – How often do you publish new blog content? I, for one, know how it feels to spend hours preparing a draft – only for WordPress to lose it later.
For the sake of this guide, let’s say you want to create general backups every two weeks.
Simply choose ‘Fortnightly’ from the drop-down menu.

Next, you need to set the starting day and time of your backup.
You can set these parameters however you want. However, I recommend scheduling a backup sooner rather than later.

Directly below your backup settings, you can specify your backup location.
By default, the plugin will save your backups on your web host storage. You can also choose a cloud storage solution once you’ve configured and linked them to WPvivid.

We will talk about using cloud storage services with WPvivid later.
Finally, you can choose which WordPress assets will be covered in this backup schedule.
Since this is a general backup, you can leave this section as is.

Lastly, you can enable “Activate this backup schedule once created” to run the backup immediately. If you’d rather wait for the scheduled start time, deselect this option.
Either way, click ‘Create Now’ to activate your general backup schedule.

Step 3: Setting up incremental backups
The thing about full website backups is, they can get pretty big.
My blog, for instance, translates to several gigabytes if I create a full backup.
That’s why I use WPvivid’s incremental backup feature.
Rather than backing up everything you specified in your schedule, an incremental backup only includes assets that are recently changed. This will save you a ton of space and money (if you’re paying for a cloud storage solution).
To set up an incremental backup schedule, go to the ‘Incremental Backup’ tab on the “Backup Schedule” page.
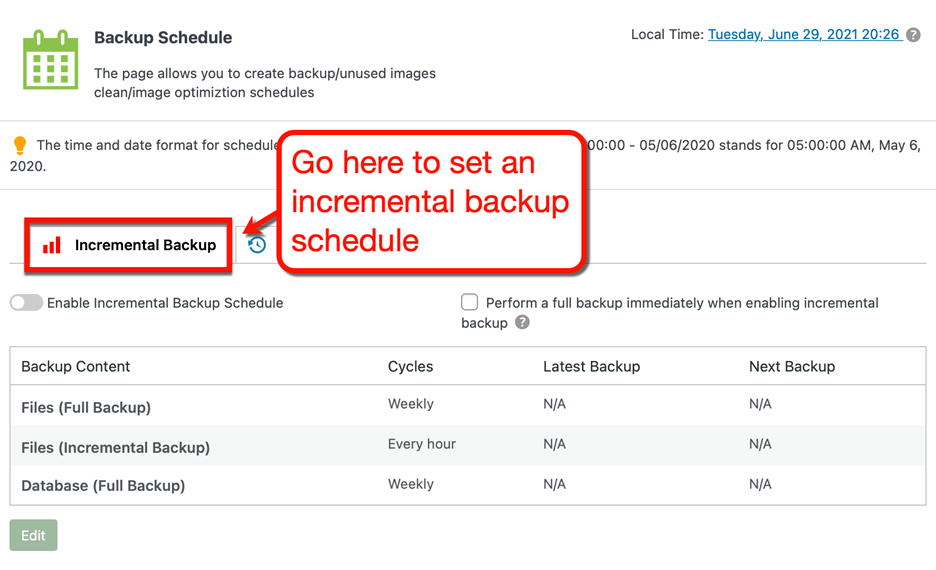
Click ‘Edit’ to start creating an incremental backup schedule.
Take note that, with an incremental backup, you can also configure regular, full-site backups. These backups will be used as a baseline when determining the files that are changed when running an incremental backup.
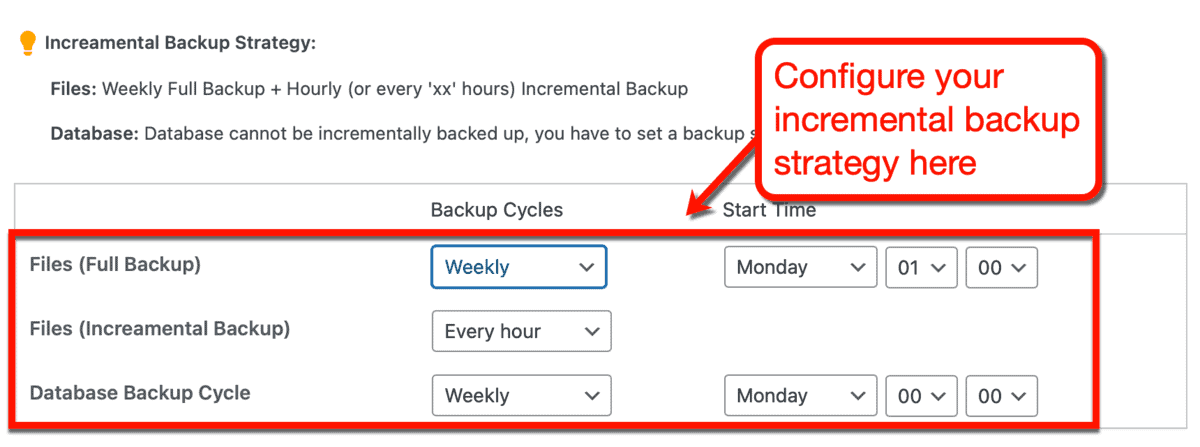
My strategy is to create weekly full backups and then set incremental backups to once a day. This ensures that I never lose any of the work I put in my blog.
As for your database backup cycle, you can make this the same as your full backup schedule.
Moving on.
Just like with a general backup, you also need to choose a backup location and the assets to be included.
Configure these settings as you see fit and click ‘Save Changes.’
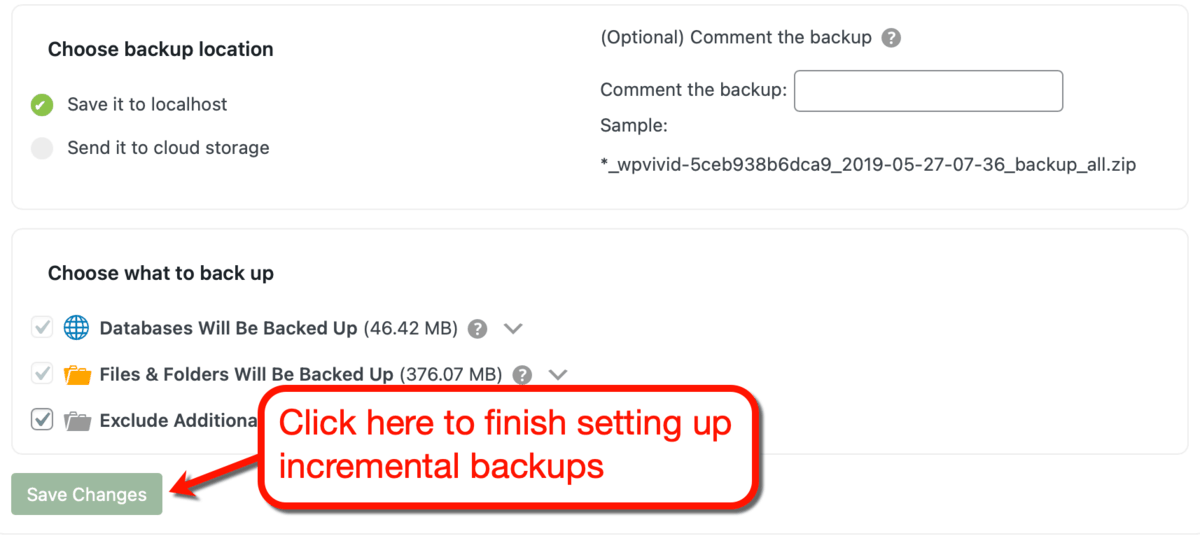
To activate your incremental backup schedule, switch on the toggle for “Enable Incremental Backup Schedule.” You can also select the option to create a full backup as soon as your incremental backup schedule is enabled.
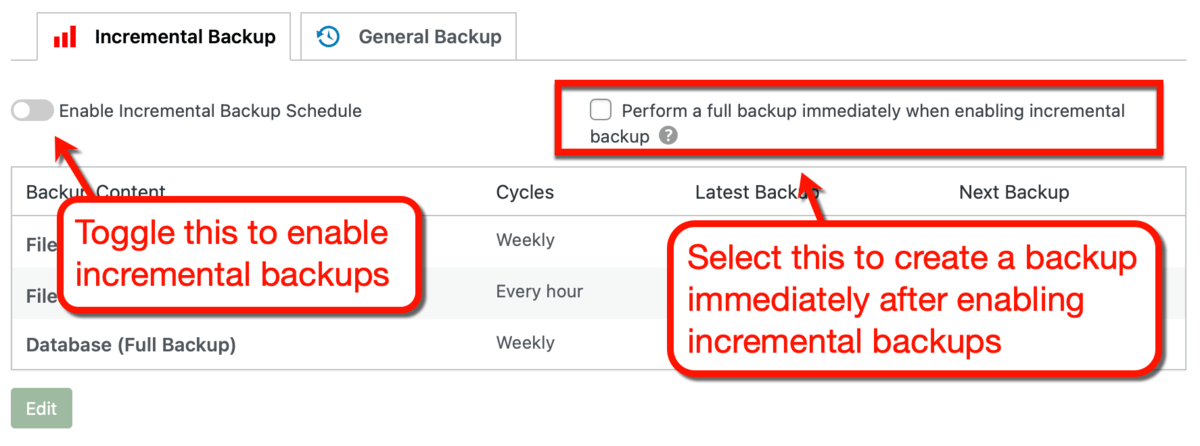
Just remember that enabling incremental backups will disable your general backup schedules.
That’s because WPvivid’s incremental backup feature already creates full backups. If both incremental and general backups can be scheduled simultaneously, you could potentially increase your backups’ storage usage by two-fold.
I personally love the incremental backup feature since you can create frequent backups without using loads of storage space. That’s because it will only include files that were changed since the last full backup.
Of course, remember that you can always create a backup whenever you want to.
Manual backups are useful if you’re planning significant changes in your website within a short timeframe. This includes site migrations, CMS changes, and rebranding.
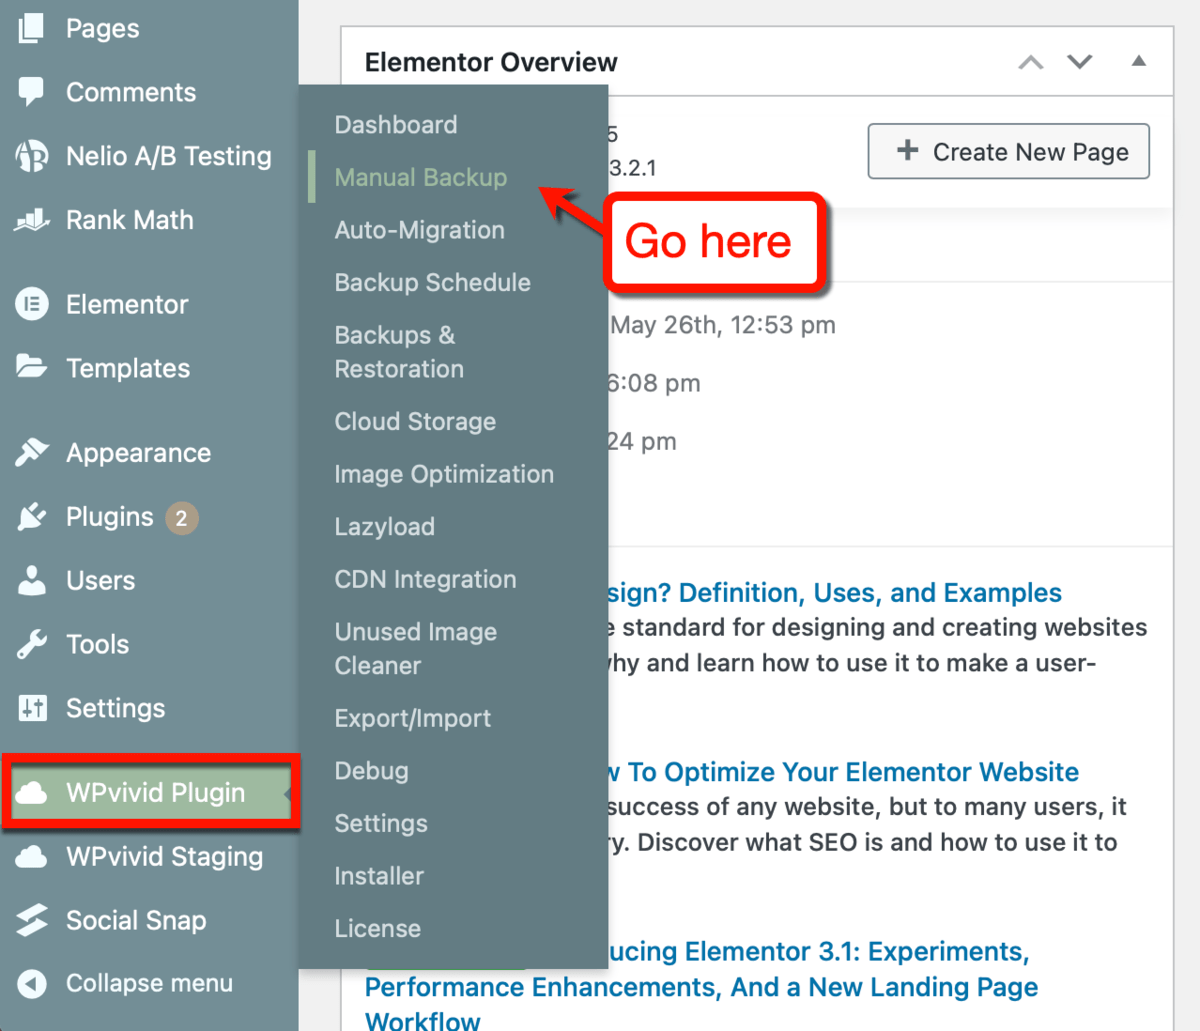
To create a manual backup, the first step is to go to the “Manual Backup” page.
Step 4: Linking your cloud storage accounts
When it comes to site backups, it’s always a good idea to have an offsite storage solution.
If you keep backups on your web host, you could still lose your data due to severe server-side issues.
The good news is, WPvivid allows you to save backups directly on your cloud storage service.
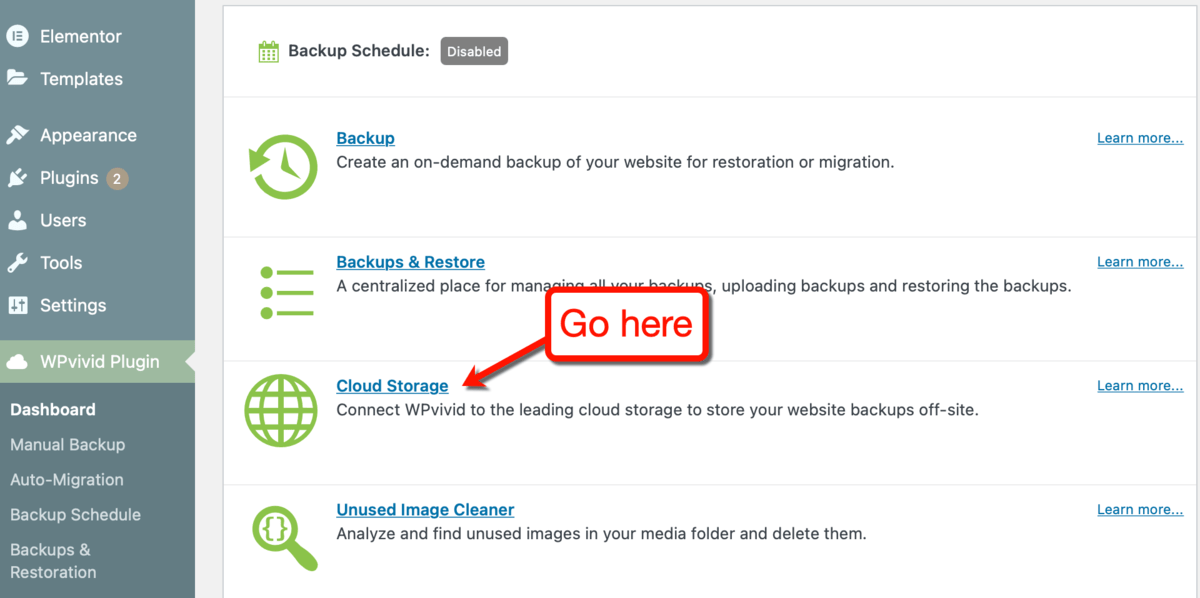
To connect your cloud storage accounts, go to “Cloud Storage” page. You can do this from your WPvivid dashboard or through WordPress’s main menu.
To set up your cloud storage solution for WPvivid, give it a name and specify your backup directories.
Suppose you want to use your Google Drive account for your remote backups.
After naming this account, you need to specify two folders: a root directory and the actual folder for your backups.
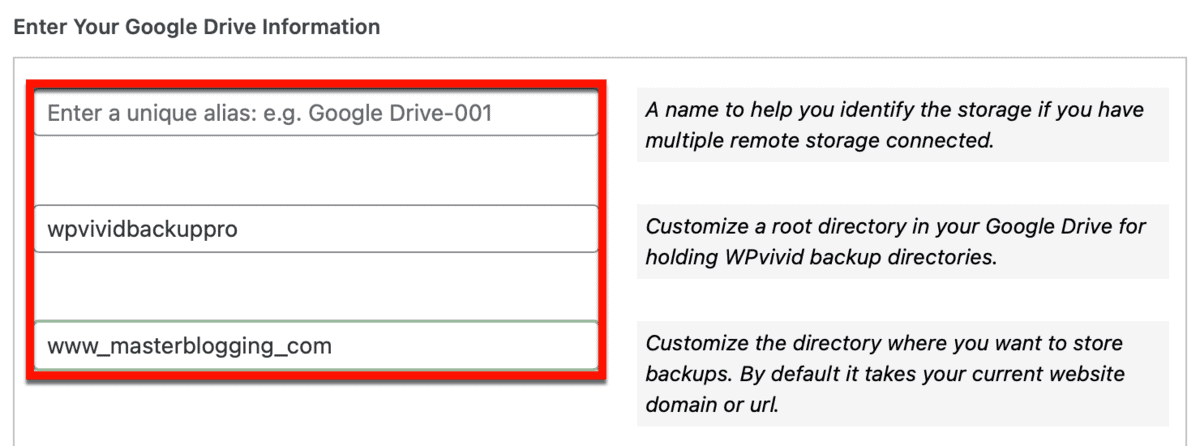
Keep in mind that the root directory is a folder that contains all the other folders for your site backups.
If you use WPvivid on multiple websites, your backups for each site will be stored in their designated backup folder. You can then access these backups from the root directory you specified.
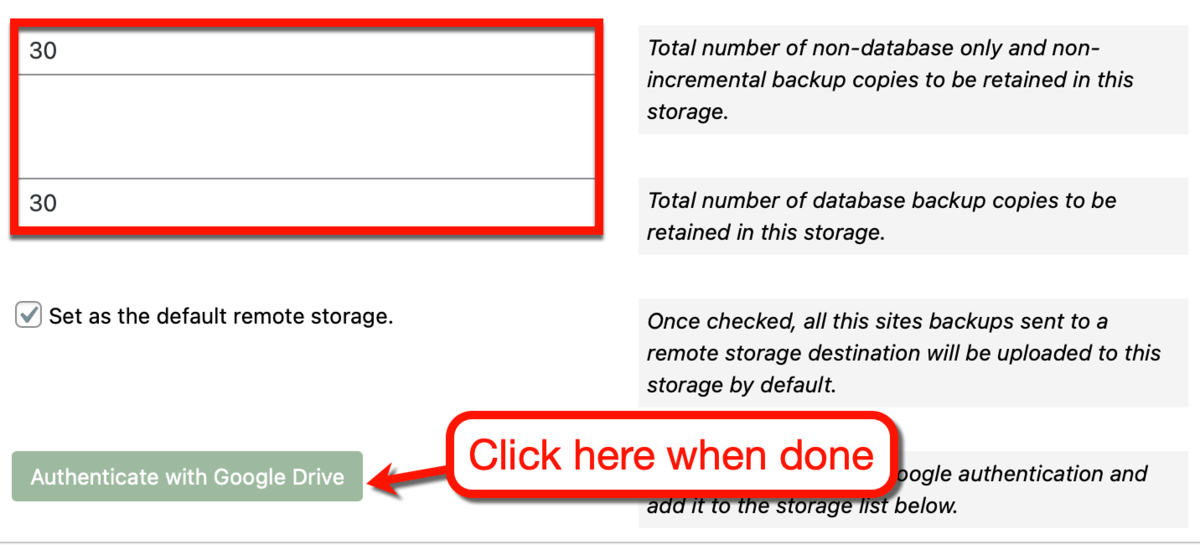
Other than that, you get to choose the number of backup copies that will be saved in your cloud storage. While you’re at it, you can also set the current service as your default remote storage solution.
When done, click ‘Authenticate with Google Drive.’
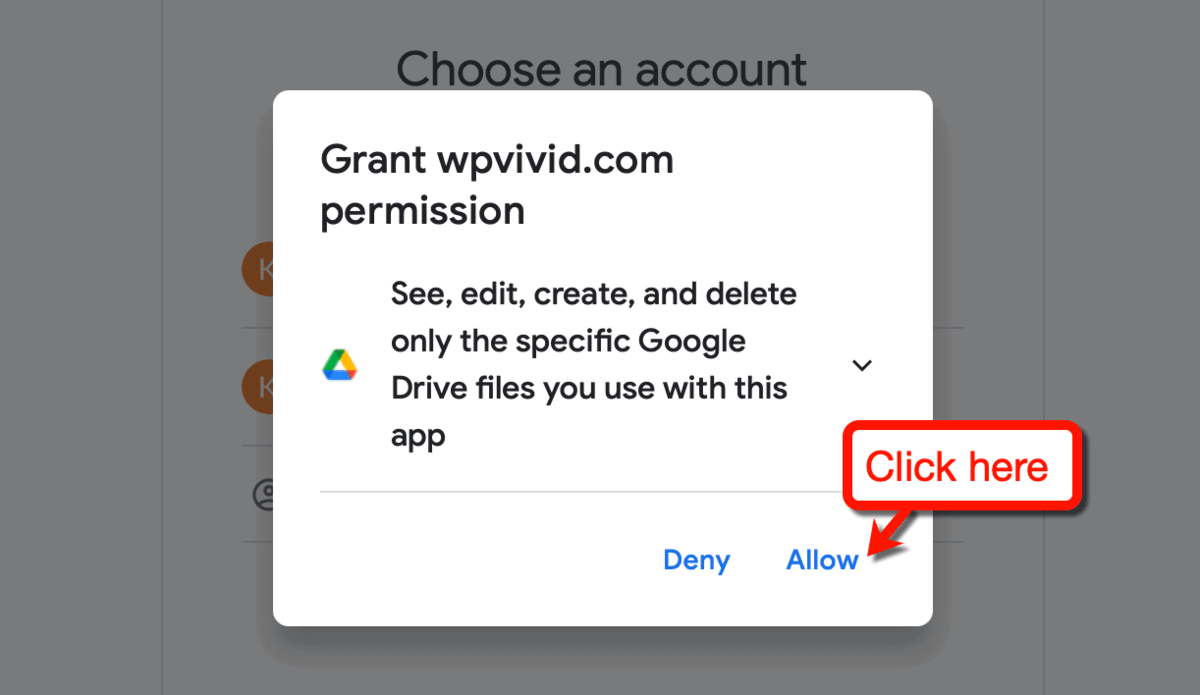
To complete the integration, sign in using your Google account and select ‘Allow’ when asked.
After authenticating your Google Dive account, you should now see it with the alias you assigned under “Storages.”

You will now be able to select your Google Drive account as a backup location when scheduling or creating backups.
Just select ‘Send it to remote storage’ during the first step.

What cloud storage service should you use for your remote backups?
I recommend checking out pCloud – a cloud storage solution with top-tier encryption. It also features seamless synchronization between devices, which is useful if you’re like me who likes blogging with multiple workstations.

To use pCloud as your remote backup storage location, you’ll need to link your account first.
Just go to the ‘pCloud’ tab from the “Cloud Storage” page. After filling in the required information, click ‘Authenticate with pCloud’ for the final steps.

Step 5: Scheduling automatic backups before updates
As far as protecting your data goes, incremental backups and remote storage locations are as good as it gets.
But with WPvivid, you can take backups a little further.
On the “Settings” page, go to the ‘Backup’ tab and look for the option “Auto-backup before updating.”
This will prompt WPvivid to create a backup right before WordPress updates any plugin, theme, or core CMS file.

You can also choose whether or not to save your automatic backups to a cloud storage service.
Automatic backups before updates will be stored on a folder called “rollback” under the root directory you created.
Step 6: Restoring backups
Okay – you already know the many ways you can create backups with WPvivid.
It’s time to talk about restoring them.
After all, if you don’t know how to restore backups, what’s the point of creating them?
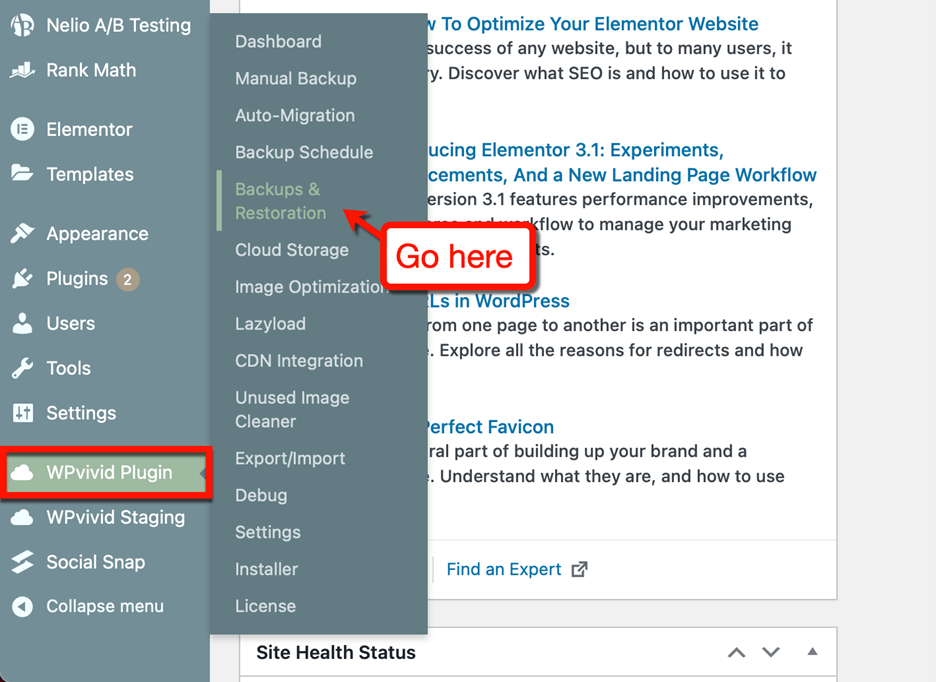
To restore an existing backup, head to the “Backups & Restoration” page.
The next step is to look for the available backups in the storage location you use. This could either be your hosting account (Localhost) or a remote storage integration.
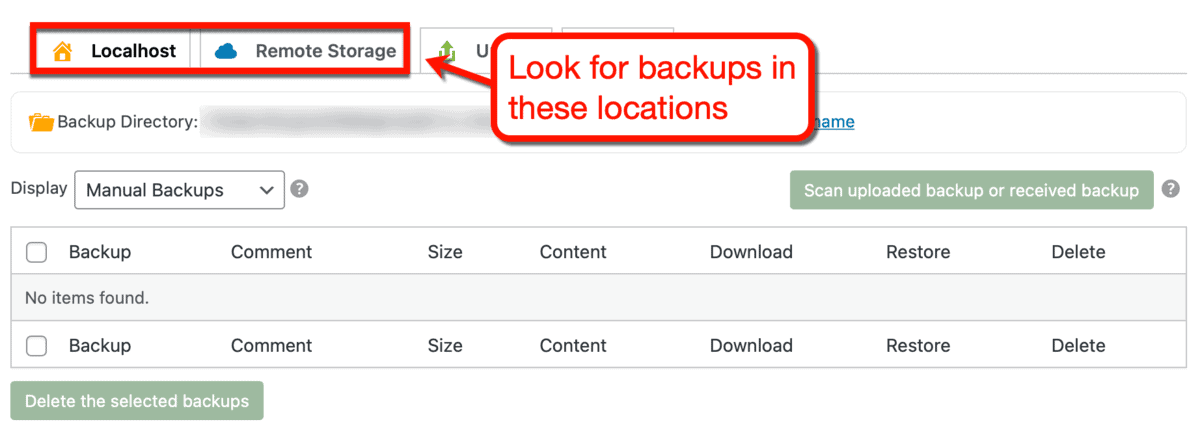
In case you can’t find any of the backups you’ve created, trying using the “scan” feature. This will prompt WPvivid to check the selected directory again.
Once you’ve found the backup you need, you can download or restore it with one click.
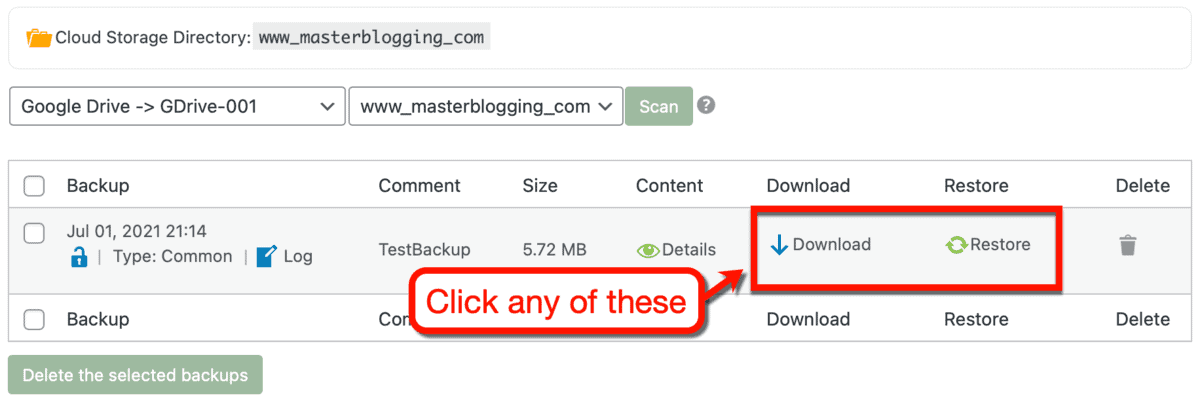
You can also click ‘Details’ to view the contents of each backup. To delete a backup, click the trash can icon or select their checkbox and click ‘Delete the selected backups.’

That’s it with backup restoration.
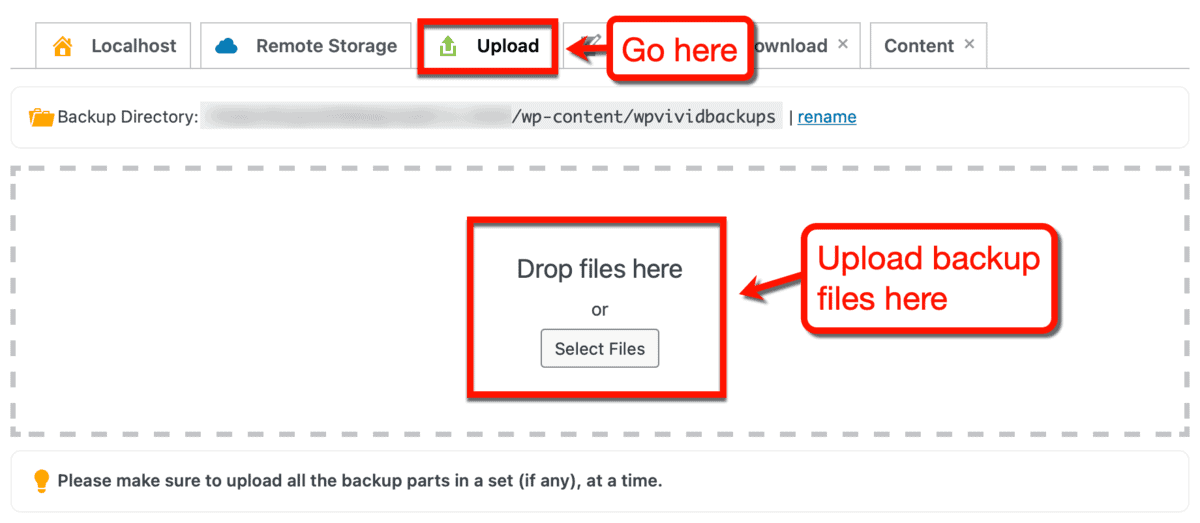
If you have other backup files lying around, you can consolidate them with your WPvivid backups using the upload tool.
Just switch to the ‘Upload’ tab and drop your backup files or click ‘Select Files’ to begin the process.
Step 7: Fine-tuning WPvivid’s backup settings
At this point, you now know everything you need to enjoy WPvivid’s main backup features.
Before we move on to its other features, let’s do a quick rundown of the settings you should check out.
For one, did you know that you can encrypt your backups for additional security?
To do this, go to the backup settings page and look for the “Database encryption” option.

Tick the checkbox for ‘Enable database encryption’ to use this feature. Next, enter a password that you’d like to use when decrypting your backup files.

Keep in mind that not even the WPvivid team will help decrypt your backups. That said, be sure to have a copy of your password stored somewhere safe – be it your wallet or phone.
The next feature I’d like you to look at is email reporting.
Basically, it allows WPvivid to send you a notification via email once a backup job is completed.
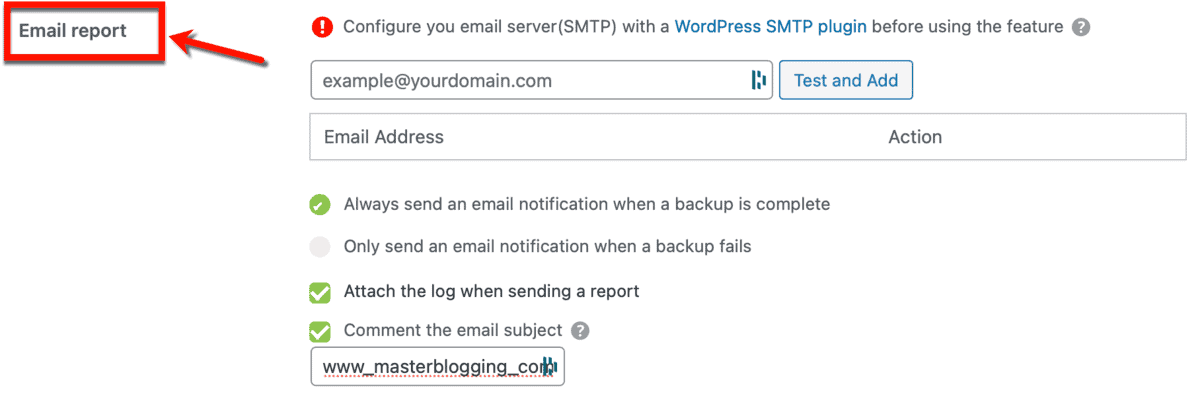
To use email reports, simply enter your email address in the email field and click ‘Test and Add.’
You can then choose to receive email notifications when a backup finishes or fails. Below these options, you can opt to attach a log to each email or use a custom email subject.

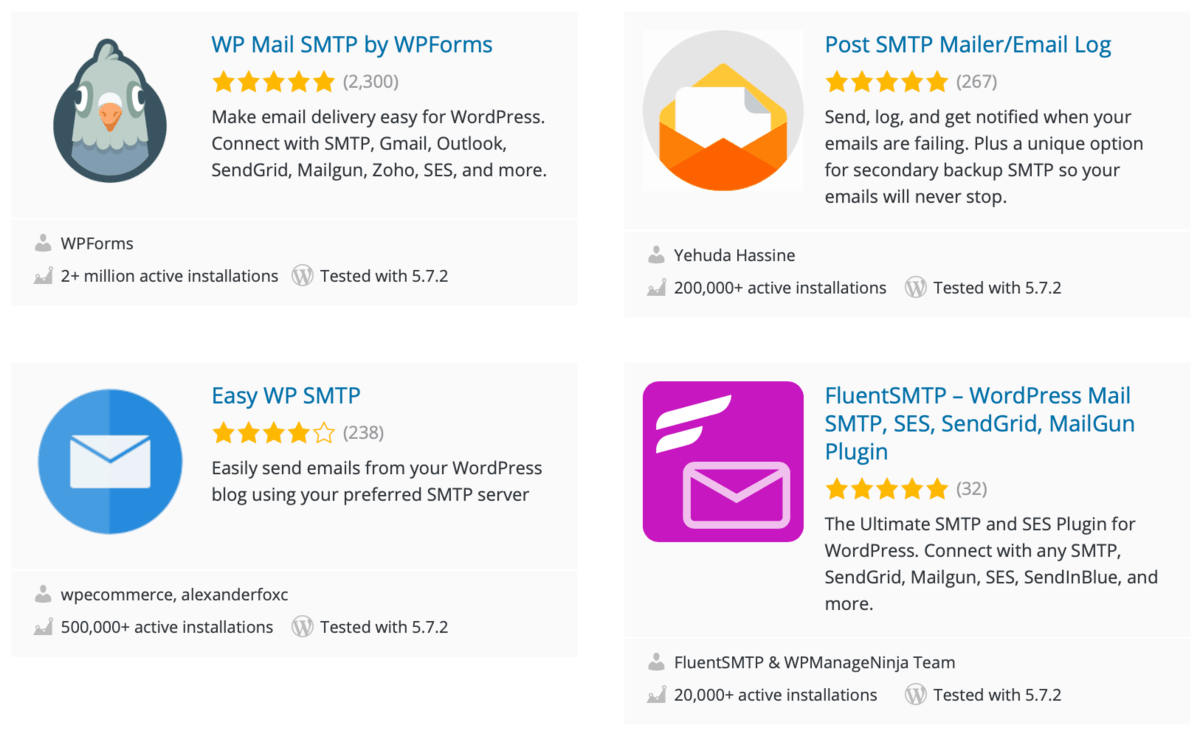
Just be sure your website’s email server is working properly. If not, there are dozens of SMTP (Simple Mail Transfer Protocol) plugins that can expedite the process.
There are also a handful of advanced backup settings you can use to adjust how WPvivid runs.
You can find these additional settings in the ‘Backup (Advanced)’ tab.
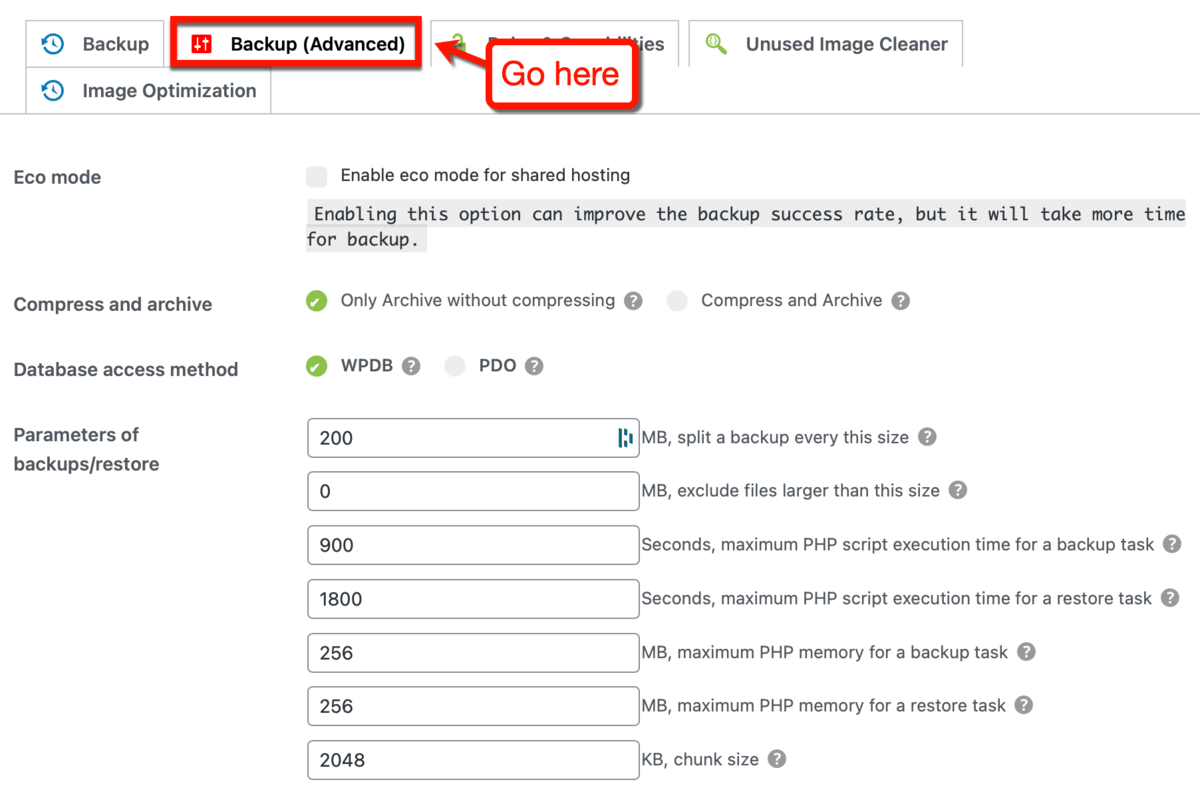
Now, I don’t recommend touching these settings unless you know what you’re doing, or if your backups are failing.
If you’re on a shared host and your backup tasks won’t finish, consider enabling “eco” mode.
This mode will throttle the write speed of WPvivid when creating a backup on your hosting service. While this means backups take longer to create, it will significantly improve the success rate of backups.
The other settings you can tweak are as follows:
- Compress and archive – You can tell WPvivid to compress and archive your backups to save storage space. But since compression increases your server’s CPU usage, it’s only recommended for those with VPS or dedicated hosting.
- Database access method – The default access method, WPDB, is reliable for running backups and restores on most setups. But if your server supports PDO (PHP Data Objects) for database access, choosing this option results in faster performance.
- Parameters of backups/restore – Lastly, you can modify additional parameters that control your backup’s sizes, execution times, memory usage, and so on. Most users should be fine using the default values in these settings.
Other WPvivid Features
You should now have a good understanding of WPvivid’s strengths in terms of backups and restoration.
However, this review is far from over.
We haven’t talked about WPvivid’s other useful features yet.
Let’s start with automatic site migrations.
Moving site data with Auto-Migration
Planning to move your entire WordPress site to a different platform?
With WPvivid’s Auto-Migration tool, you can do it in just a couple of steps.
First, you need to access the WordPress dashboard of the website you’re moving your data to. From there, install WPvivid and head to the “Auto-Migration” page.

Here, go to the ‘Generate A Key’ tab and click ‘Generate.’ You’ll need this key to allow your old website to send backups to your new site.
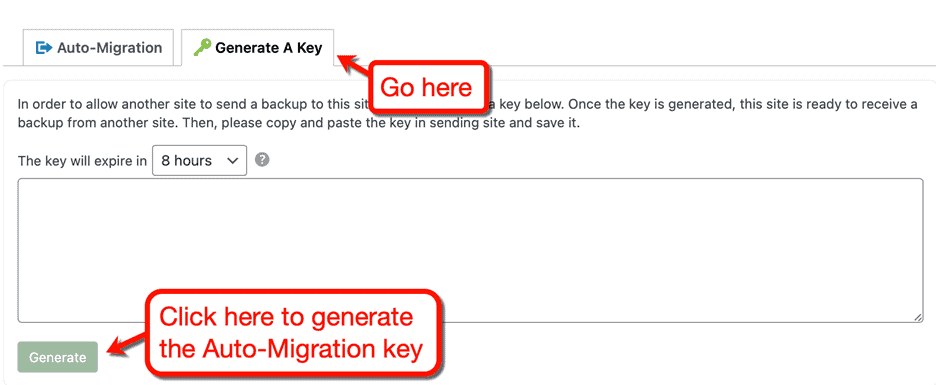
Bear in mind that Auto-Migration keys expire after a set amount of time.
You can stretch the time limit to 24 hours. But to be on the safe side, I recommend using your Auto-Migration keys as soon as you generate them.
After generating the key, the next step is to paste it into the WordPress website you’re migrating from.
Just fire up WPvivid’s Auto-Migration tool, paste it in the first field you see, and click ‘Save.’

Great – you can now transfer website backup data to your new platform.
WPvivid lets you choose if you want to migrate your database, files, or both.
It may take some time for the transfer to complete. Once it’s done, you should be able to “restore” your backup data on your new site – thus, completing the migration.
Optimizing images to improve website performance
Image optimization is one of the things I always recommend when it comes to improving website performance.
If you paid for WPvivid, you don’t have to worry about that anymore.
WPvivid comes with a built-in “Image Bulk Optimization” tool that can optimize your entire image library for you.
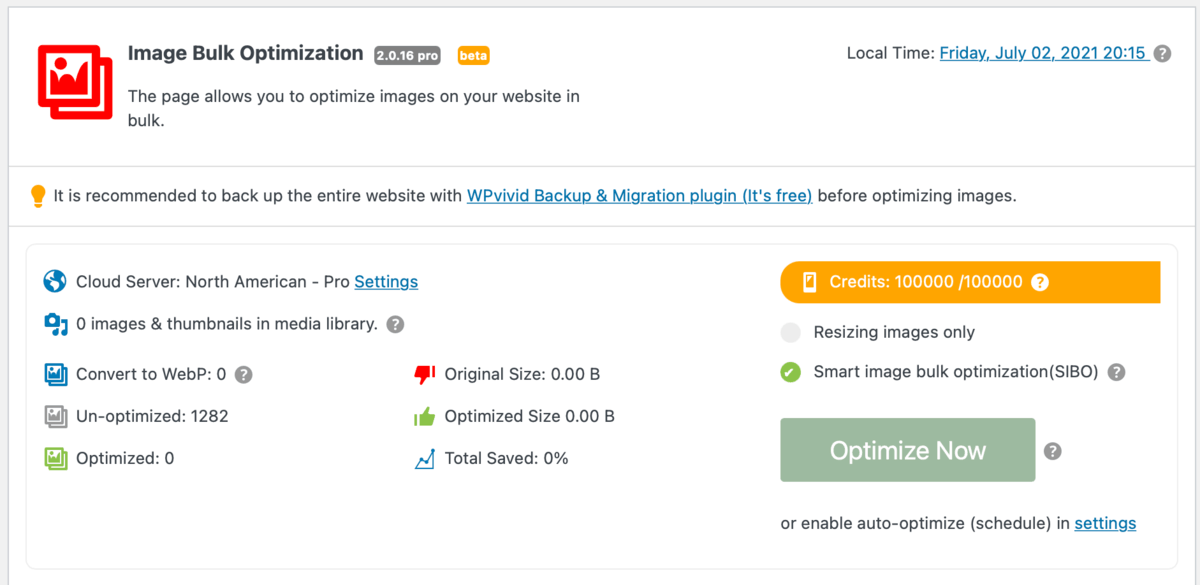
Just be sure to customize WPvivid’s image optimization settings before you click that big ‘Optimize Now’ button.
Doing so allows you to set an optimization schedule, the folders you want to optimize, and your preferred compression method.
I suggest sticking with the ‘Lossless’ compression mode to get a decent performance boost without sacrificing image quality.
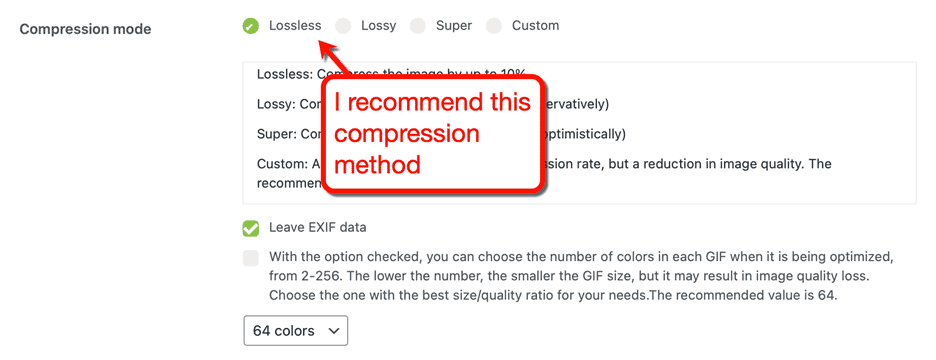
If you want, you can also set WPvivid to optimize images as soon as they’re uploaded. All you have to do is select ‘Optimize immediately after uploading’ in “How to optimize.”

Worried that you might not like the results?
Don’t fret – you can configure WPvivid to create image backups right before optimizing them.
It’s truly a “set and forget” type of tool that can help bloggers keep their sites in top form.
Enabling lazy loading
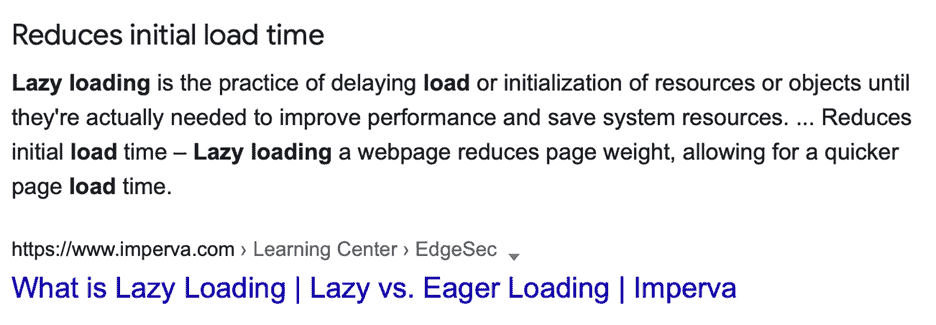
Asynchronous loading, also known as “lazy loading,” is a technique that can improve the loading speed of image-heavy websites.
It works by delaying the initialization of images on a page until they’re needed. That is, when users scroll to a point where the image is actually visible.
The cool thing is, you don’t need to rely on some coding wizardry to utilize lazy loading.
WPvivid has a tool that can implement this feature for you with a single click.

At first, lazy loading might sound like an odd way of improving website performance.
From a user’s perspective, paragraphs with missing images – only for those images to pop in seconds later – may look awkward.
Good thing WPvivid features a “fade in” animation for delayed images.
This is automatically enabled by default. And, by the looks of it, WPvivid’s development team initially planned to have multiple animation options.

Removing unused images from your library
As a WordPress blogger, I can almost guarantee that you have lots of unused images sitting in your media library.
We all went through a stage where we just can’t decide what to put on our blog.
Placeholders, featured images, logos, banner backgrounds – there are just so many combinations that could work. Once you’re happy with your website’s design, chances are you forgot to delete the old images you no longer need.
WPvivid can help clean up your media library by detecting and deleting those unused images for you.
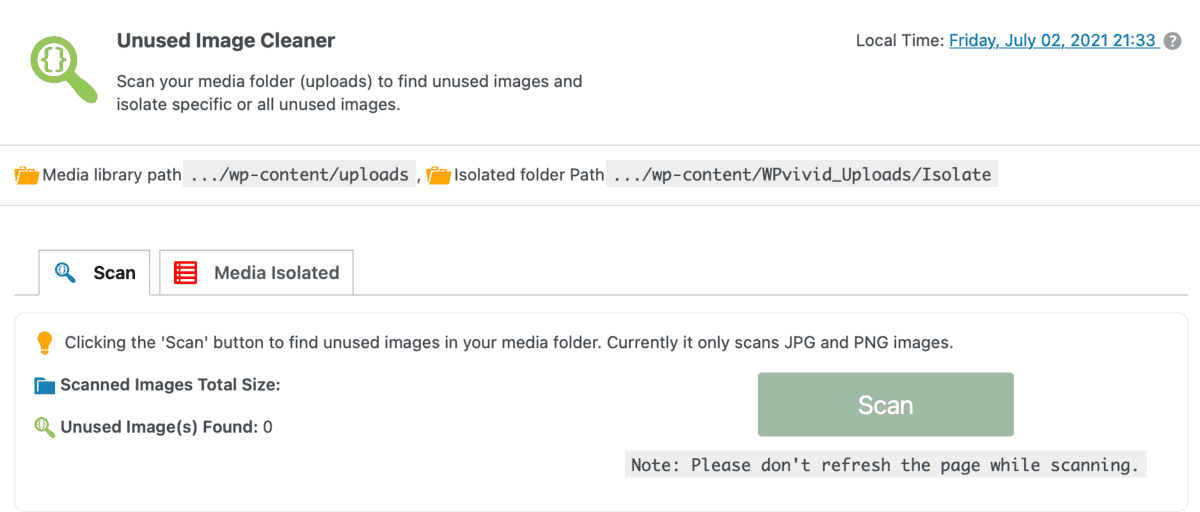
After scanning, you’ll be presented with a list of all the images you no longer need.
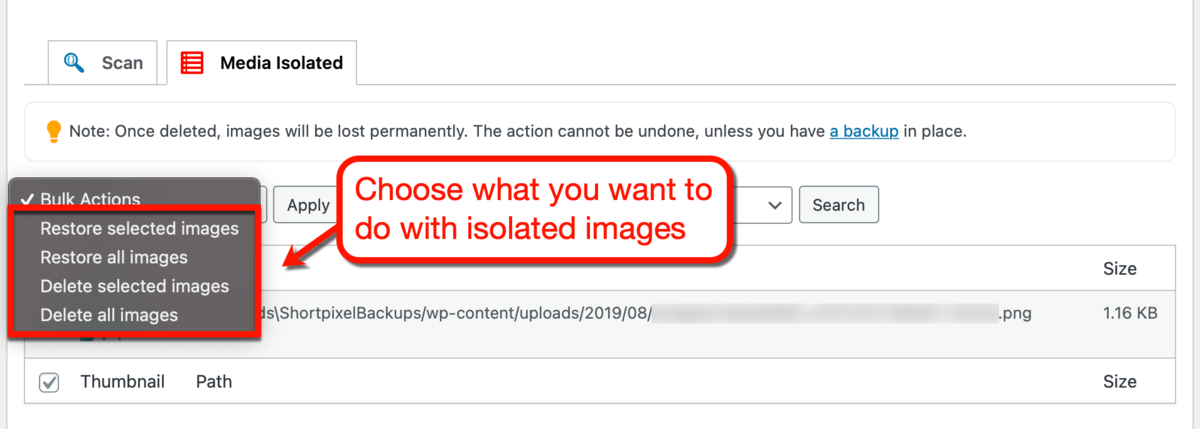
You then have to select the images you want to isolate or select everything at once. Isolated images can then be restored or deleted outright.
Integrate a Content Delivery Network
WPvivid has one more feature that can help improve your blog’s performance.
Using the CDN Integration tool, just enter your CDN URL and click ‘Enable CDN to deliver your content.’

CDN stands for “Content Delivery Network,” which is a network of proxy servers distributed across multiple regions.
CDNs improve a website’s speed by spreading the workload of website data transfer across multiple servers. To reduce latency, the nearest server will be used to deliver data to users.
Of course, you don’t need to use WPvivid to use a CDN with your WordPress website.
It is, however, good to have all your website optimization tools in one place.
Create staging sites for web development
A staging site allows you to experiment with your blog’s design and features without affecting the main site’s performance.
It works by creating a copy of your website, including its pages, databases, media, and posts. You can then freely modify its contents – useful if you’re planning to redesign pages or the entire site.
To create a staging site with WPvivid, visit ‘WPvivid Staging’ from your dashboard. Once there, click ‘Create A Staging Site.’
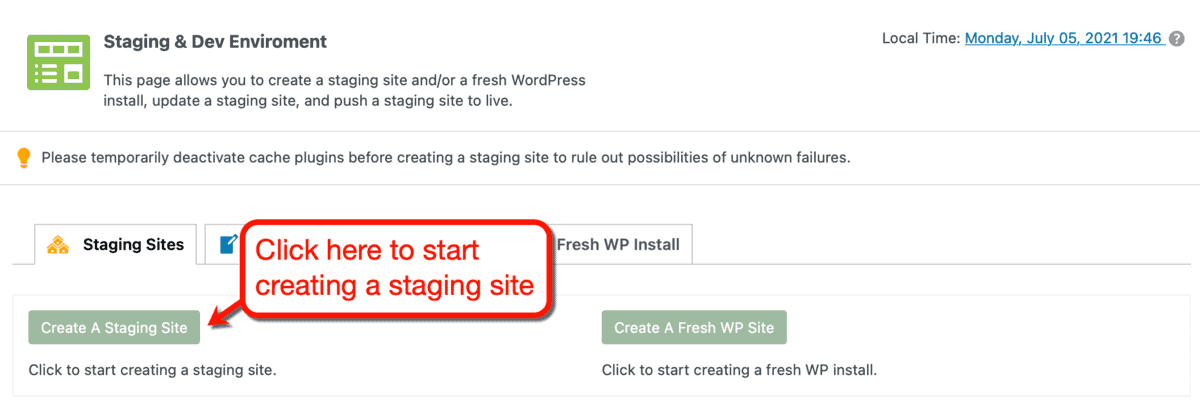
During the setup stage, you can fine-tune the staging site’s directory and database configurations. You also exclude specific files and folders when building your staging site directory.
When done, click ‘Create Now.’

WPvivid also makes it easy to push the changes you made on the staging site to your live website. To make sure the process goes as smoothly as possible, you can choose which assets will be published.
If you’re planning a total overhaul of your blog’s design, you can start from scratch with a fresh WordPress installation.
Thankfully, you need to host another website for this. You can simply use WPvivid’s staging feature to create a fresh install from within your own site.

Just like a staging site, you can push the changes you made in your fresh install to your live site. In other words, you can completely revamp your blog while your original design remains accessible to users.
WPvivid Pricing
WPvivid is more than your average WordPress backup plugin.
It’s a comprehensive tool that can help with other things, like CDN integration, performance optimization, and website staging.
Despite that, it manages to keep costs low – perfect for budding bloggers who need to save every penny.
Take a look at WPvivid’s super-affordable subscription plans:
| Feature | Basic | Freelancer | Ultimate |
| Price | $49 per year | $99 per year | $149 per year |
| Websites | 3 websites max | 100 websites max | Unlimited websites |
| Backup and restoration | Yes | Yes | Yes |
| Staging | No | Yes | Yes |
| Database encryption | Yes | Yes | Yes |
| Incremental backups | Yes | Yes | Yes |
| White label tools | No | Yes | Yes |
WPvivid Frequently Asked Questions
What is WPvivid?
WPvivid is a backup and site migration software designed to work with WordPress websites. It also comes with features like image compression, lazy loading, and staging site creation.
Is WPvivid free?
The base WPvivid WordPress plugin is free and available to install from the official plugin library. However, it lacks all the important features that make WPvivid a top-tier backup plugin.
Does WPvivid Backup Pro offer free trials?
WPvivid offers a 14-day free trial that includes all of WPvivid’s premium features. The trial version can be used on up to two websites with advanced features fully unlocked.
Who is WPvivid for?
WPvivid is for bloggers, businesses, and digital entrepreneurs who use WordPress. It is an essential plugin that secures all the work you’ve put into building your site.
Does WPvivid offer refunds?
In case you’re not happy with your purchase, WPvivid can give you a full refund equal to your subscription payment. Refunds will only be granted if you send a request within 30 days of your purchase.
Can I use WPvivid on multiple websites?
You can use WPvivid on up to three websites with a basic subscription and 100 websites on a “Freelancer” subscription. Subscribing to the WPvivid “Ultimate” plan allows you to install and use the plugin on unlimited websites.
Conclusion
WPvivid is everything you can ask for in a backup plugin and more.
If you value all the hours and effort you put into building your site, you should seriously consider buying it. It allows you to work on your blog with confidence – knowing that your data will always be saved and secured.
Besides, WPvivid is actually one of the cheapest tools I’ve ever blogged about.
Given all the features it brings to the table, I can definitely say that it’s worth the money.
If you have questions regarding what you read, feel free to leave a comment below. While you’re at it, let me know what you liked or disliked.
You can also check the links below for alternatives when it comes to site backups and performance optimization.
Click here to try WPvivid today.
You Might Also Like:
- 5 Best Content Writing Services for Bloggers (for 2021)
- 17 Effective Tips to Reduce Blog Page Load Time
- More Tools That Can Up Your Blogging Game (My Personal Toolbox)


Post a Comment